Motorola has a line of IMPRES chargers and batteries to help extend the life of your battery, giving you longer runtimes and better charges. The charger will show different LED lights telling you what stage of charge your battery is in.
In this article, we’ll talk about what each LED light indicates and explain a little more about IMPRES.
- What does IMPRES mean?
- Benefits of IMPRES batteries and chargers
- What do the steady lights mean on an IMPRES charger?
- What does the FLASHING light mean on an IMRPES charger?
- IMPRES 1 vs IMPRES 2? Can I use the same charger?
- Troubleshooting
- Reconditioning IMPRES battery with Charger
- Aftermarket batteries with IMPRES charger
What does IMPRES mean?
IMPRES batteries by Motorola are designed for simple, reliable care and are equipped with an innovative charging system that when paired with an IMPRES charger, reconditions the battery, extending its life.
The reconditioning batteries are meant to restore it to its normal full capacity. During a recondition, the charger will fully deplete then recharge the battery to eliminate the memory effect.

Benefits of IMPRES Batteries and Chargers
IMPRES reduces the amount of work you have to do with tracking your battery use. All you need to do is place the battery in the charger and remove the battery when done.
Using an IMPRES charger with an IMPRES battery helps,
- Maximize the operation time between charges with no memory effect. Memory effect often happens when your battery remembers its last charge and discharge cycle, ultimately, decreasing its life cycle every time.
- Reduce heat during post charge cycles
- And eliminate the need for additional reconditioning equipment and trained battery personnel.
IMPRES batteries have an internal memory that is read by IMPRES chargers. When an IMPRES battery is charged for more than 2.5 minutes, the charger will read the battery serial number. You can remove the battery from the charger for up to 30 minutes, then once the battery is reinserted into the charger, it will resume the charge from when it was first removed.

What do the Steady Lights Mean on an IMPRES charger?
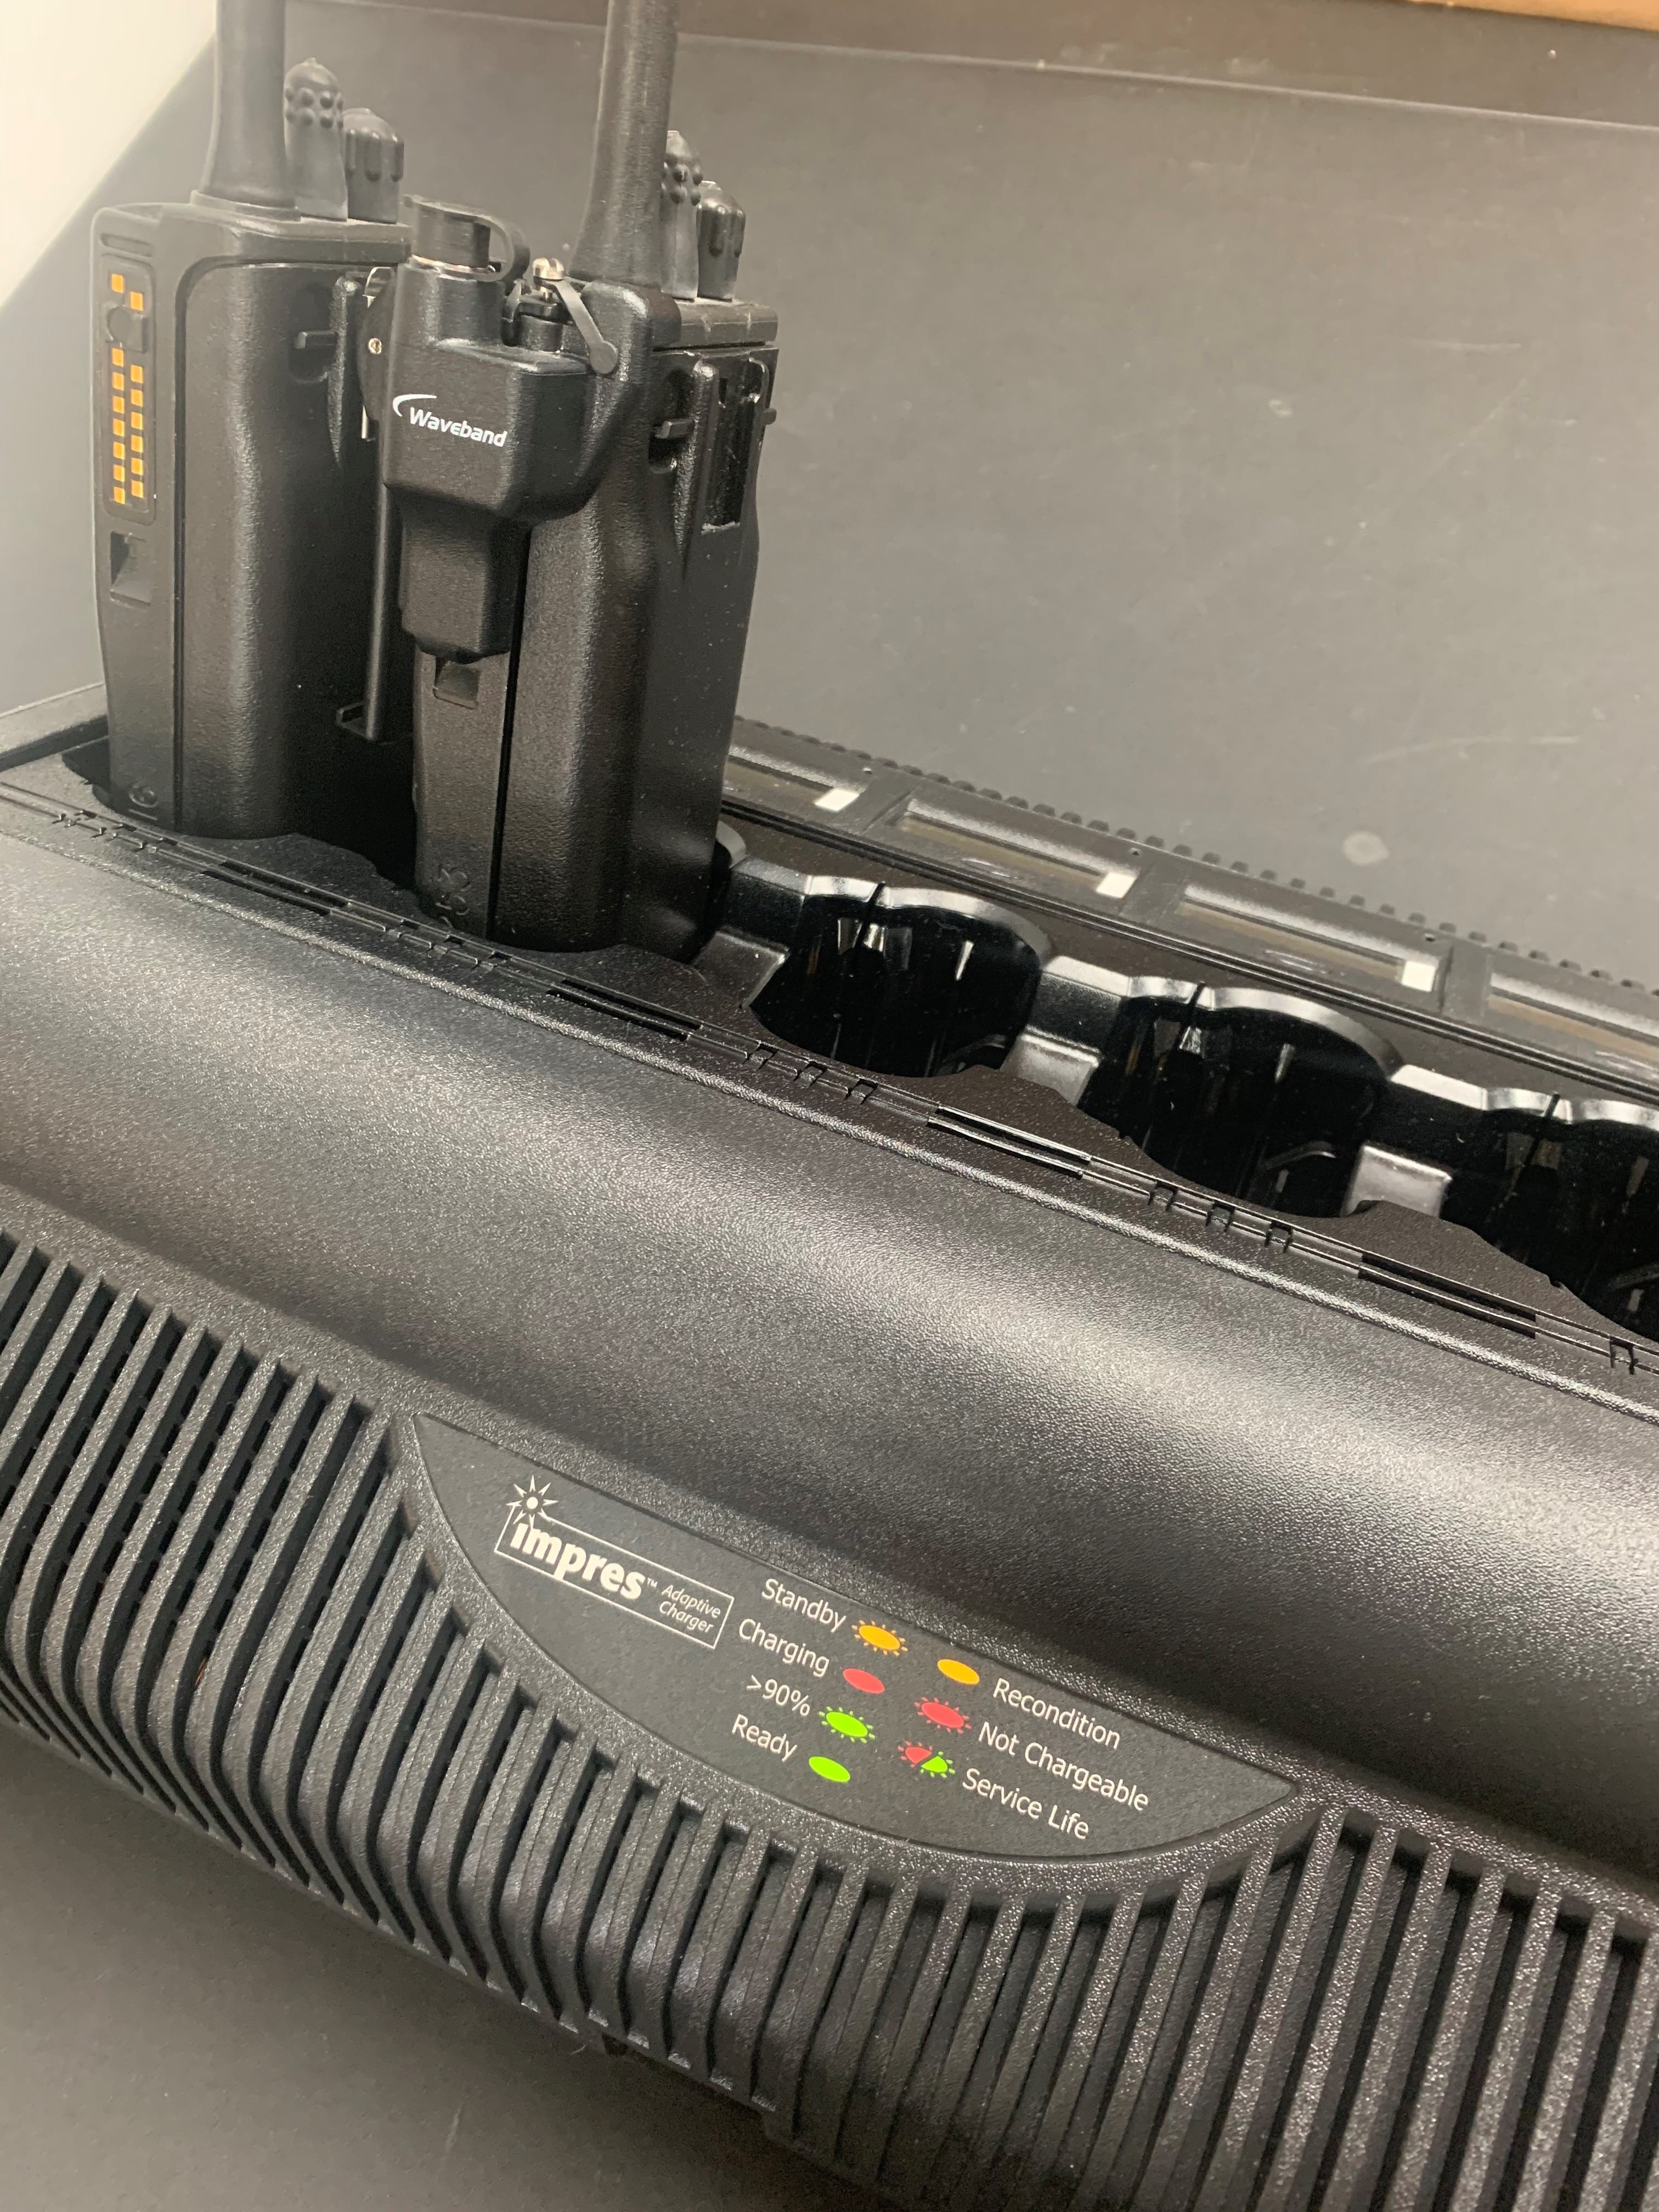
When using your IMPRES charger, you’ll notice a few different LED lights. Motorola IMPRES charger lights indicate what cycle the battery is in its charging process.
Below is a list of what each solid LED light means on an IMPRES charger. Flashing LED lights, which may be a problem with your battery, are reviewed next.
SINGLE FLASH GREEN: Begin charge. Charger has successfully powered on.
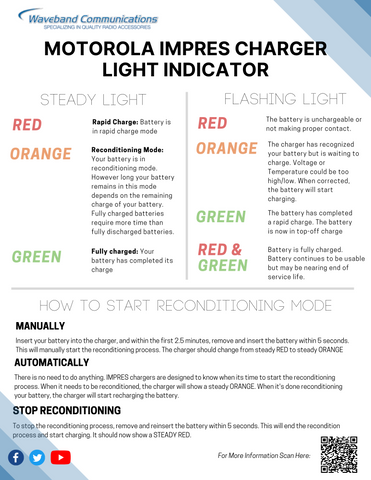
STEADY RED: Battery is in Rapid Charge Mode.
STEADY GREEN: Battery has completed its charge and is fully charged.
STEADY ORANGE (ONLY IMPLIES TO IMPRESS BATTERIES): Your battery is in reconditioning mode. However long your battery remains in this mode depends on the remaining charge of your battery. Fully charged batteries require more reconditioning time (8 hours or more) than fully discharged batteries.
Print a Copy of the Motorola Impres Charger LED Sheet to Keep in Your Office
What does the FLASHING light mean on an IMPRES charger?
Your IMPRES charger may flash different colors of green, orange, or red. This may mean your battery is just completing its charge time like normal but other LED flashes may be a warning to the state of your battery.
Below, is a list of what each flashing LED light means on your IMRPES charger.
FLASHING GREEN: The battery has completed rapid charge (>90%) and is now in top off charge.
FLASHING ORANGE: The charger has recognized the battery but is waiting to charge. Battery voltage could be too low or temperature could be too low or too high to allow for charging. When corrected, the battery will start charging.
FLASHING RED: The battery is unchargeable or not making proper contact with the charger.
FLASHING RED/GREEN: The battery is fully charged and continues to be usable but may be nearing end of service life. Start looking for replacement batteries if you do not have one already.
FLASHING AMBER (YELLOW)/GREEN: The battery is in recalibration mode. As soon as possible, enable calibaration and calibrate the battery. You can force calibration by removing and reinserting the battery within a few seconds. Wait until a solid green light is indicated to know calibration is complete.
IMPRES 1 vs IMPRES 2? Can I use the same charger?
Motorola now has two generations of IMPRES batteries known as IMRPES 1 and IMPRES 2. IMPRES 2 is known as their next-generation system that charges batteries 40% faster and at a higher capacity giving you more talk time. IMRPES 2 also lets you charge 60% more times than a standard Li-Ion battery.
Check your manual to see if your battery is supported with your charger.
Troubleshooting
While operating your IMPRES battery charger, problems could arise. Below we will talk about each problem and what to do to get your charger working again.
Problem: Charger has no lights
What it means: Charger contact is not being made or there is no power to the charger.
What to do: Check that the battery is properly inserted into the charger. Also, make sure that the power cord is successfully plugged into the charger. If this does not work, Motorola thinks you should replace the fuse.
Problem: Charger flashing red
What it means: Charger contact is not being made or the battery is not chargeable.
What to do: Remove the battery from the charger and place it back into the charger. Remove power from the battery charger and clean with a dry cloth the gold metal contacts of both your battery and the charger. If this does not work, it’s time to replace the battery.
Problem: Flashing orange
What it means: IMPRES Battery is waiting to charge. This could mean your battery is too cold or too hot that it’s making the battery voltage too low for the charge to start.
What to do: When the temperature of the battery is corrected, charging should begin.
Reconditioning IMPRES Battery with Charger
You can either manually or automatically recondition the batteries.
To manually start the reconditioning process, insert your battery into the charger, and within the first 2.5 minutes, remove and reinsert the battery within 5 seconds. This will manually start the reconditioning process. The charger should change from a STEADY RED to a STEADY ORANGE.
Manually reconditioning batteries would be beneficial when you have batteries that have been in storage for several months. Otherwise, the charger is going to determine when the reconditioning process should start.
To automatically start the reconditioning process, there is no need to do anything. IMPRES chargers are designed to know when it’s time to start the reconditioning process. When it needs to be reconditioned, the charger will show a STEADY ORANGE. When it is done reconditioning the battery, the charger will start recharging your battery.
To stop the reconditioning process, remove and reinsert the battery within 5 seconds. This will end the recondition process and start charging. It should now show a STEADY RED light.
Aftermarket Batteries with IMPRES Charger
Aftermarket OEM batteries can be used with an IMPRES charger if you ensure compatibility. IMPRES batteries, like those from Waveband Communications, are okay to use and are compatible with an IMPRES charger.
Below is a list of part numbers that are IMPRES compatible and will recondition.
- KAA0101
- WV-6035
- WV-6038-LIP
- WV-7036-LI
- WV-6039-LI
Waveband Communications is a manufacture of OEM comparable two-way radio batteries and accessories. Waveband offers a line of IMPRES compatible batteries, and reconditioning chargers to get the most use out of your lifeline. Let us show you how to improve your two-way radio with reliable radio accessories.


6 comments
Anonymous
Alex, I’m unfamiliar with what the lights mean on the radio. I also don’t know the model you are using. Here are a couple of things I’d recommend.
1. Look at your radios user manual, they should have a section that tells you what the colors represent. Looking at other Motorola radio manuals, it appears to be something related to emergency alerts.
2. If you can’t find it there, try posing a question on https://forums.radioreference.com/
3. If still unsure, I’d contact Motorola or wherever you purchased the radios.
Alex Norton
what does it mean if the light is flashing orange when the radio is NOT charging? We tried multiple batteries, and the light still blinks orange. When people talk, the light starts flashing green, but reverts back to flashing orange after they finish talking.
Anonymous
Hilde,
Thanks for your question. It depends on how long they are being stored. If a battery is in storage for more than 2 months, it will need to be fully recharged before you use them again. If you are talking about just daily storage when they are in not in use, like in between service calls, only charge the battery when it really needs it. Overcharging a battery will shorten its life. I would carry spare batteries to swap them out if one is dying and then recharge the dying battery for about 3-4 hours on an IMPRES charger. Here is a good article on caring for a battery, https://www.wvbandcoms.com/blogs/blog/two-way-radio-battery-care
Hilde
Good Day,
I have in use batteries PMNN44489A for DP4400 Motorola Radios , these are stored away from the charger at the location of the Fire Man suits.
What is the recommended interval to recharge the battery so they are in optimal condition in-between charges for use in an Emergency.
Do you recommend that it is always kept on charge when standby
Thank You
Anonymous
Howard – It sounds like an alternating amber (sometimes can appear yellow or orange) / green mean you need to enable calibration and calibrate (or initialize) the battery. Especially since these are new batteries. In most cases, this happens automatically but may need to be manually initiated. I would refer to your IMPRES manual on initializing batteries. If you go to this link here and scroll to page 13 there is instructions on this https://btw.com.au/files/manuals/PMPN4283_PMPN4286_PMPN4288_Multi-Unit_Charger_Kits_User_Guide_en.pdf
Howard Bassham
After conditioning a new battery it charges to flashing green and then to flashing green – yellow and stays there.